Showing posts with label sewing. Show all posts

Thursday, April 23, 2015

The Time I Made a Tulle Wedding Dress

By far my most daring sewing project of all time, I was approached my my husband's darling youngest sister in 2010 to make her wedding dress.  Based off a blog entry in Swedish.  So of course, I said yes.

The idea came from Joanna Goddard's post on Bliss: All About Weddings.  A few link-throughs and we found more detailed pics.  Katrina said it was love at first sight.  It was the only one that would do.

Loved: the subtle hints of color throughout the skirt.


Loved: the lace accents in between the tulle layers.


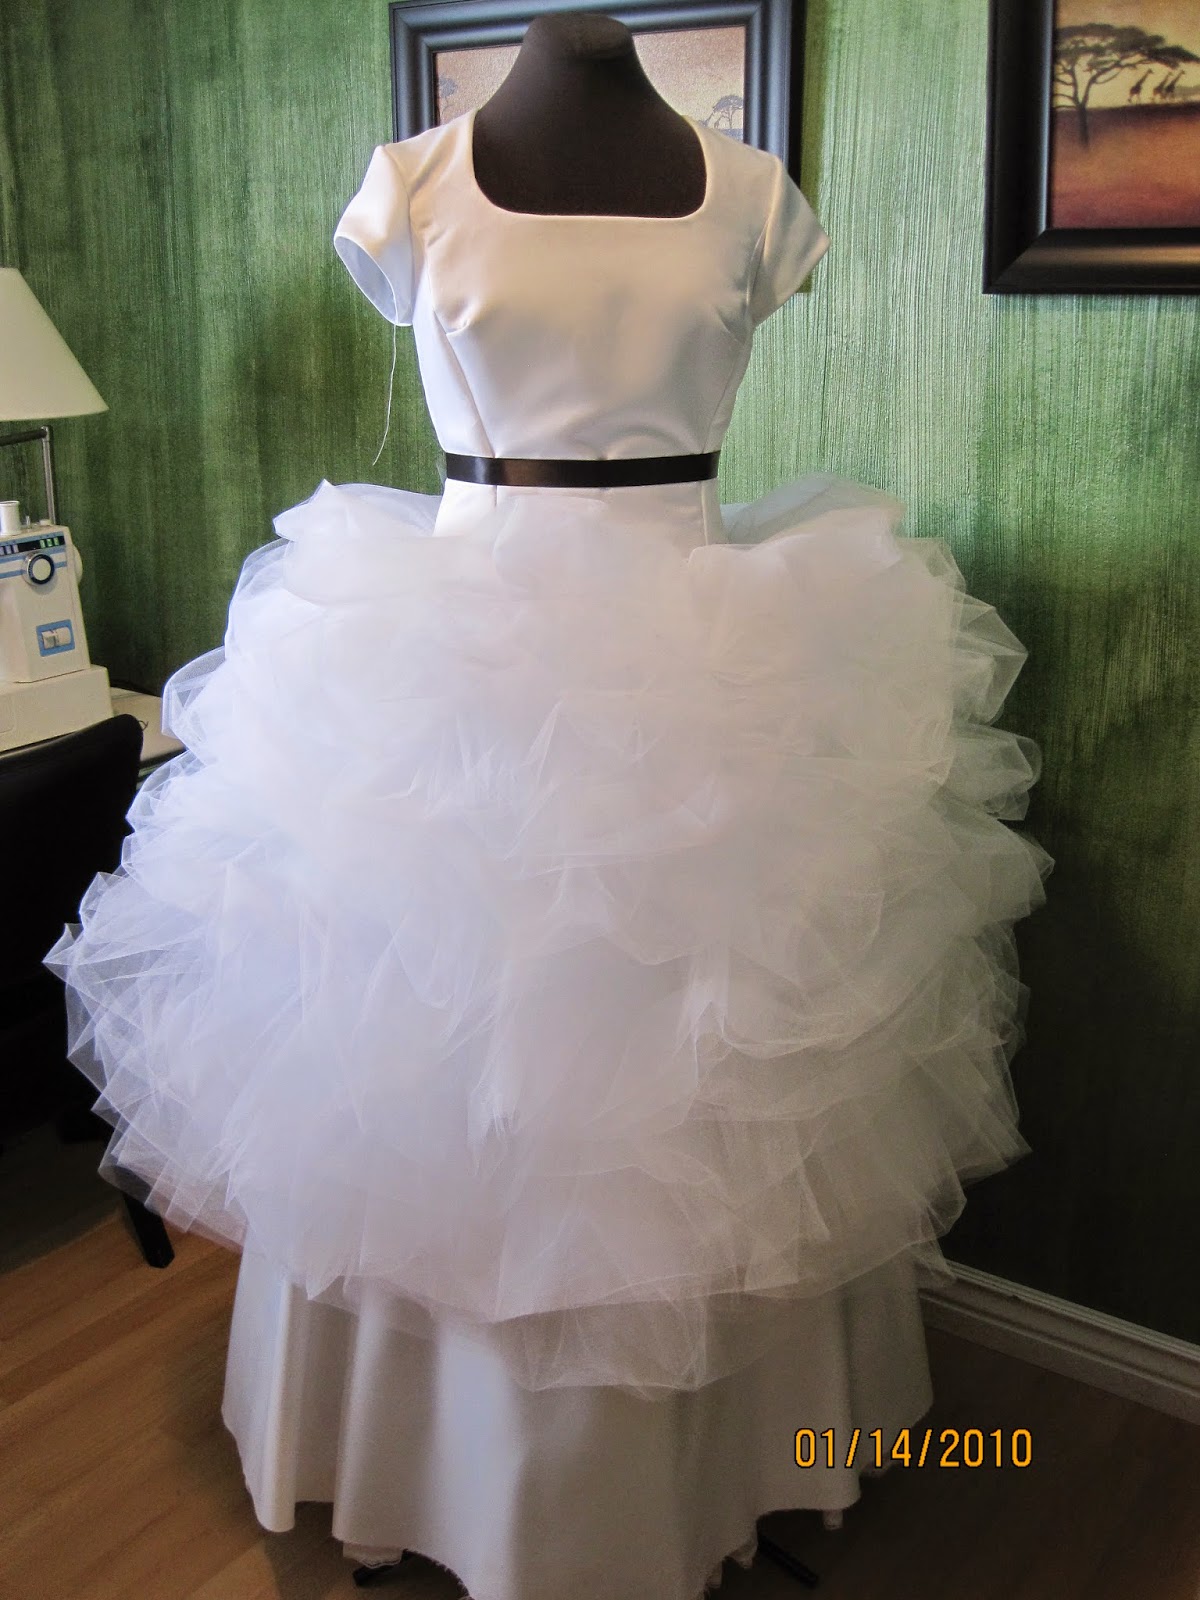
Loved: the black ribbon belt and plain top (must add sleeves).


The process began.  It was a paced, planned, scheduled project; my only one of it's kind, really. We found two patterns: one for the bodice that fit so perfectly she couldn't comfortably raise her hands above her head, and another for the underskirt. I made a mock-up out of cheap fabric, then the real one out of satin.


Then the craziness of tulle began: layer after layer after layer of gathered tulle, an entire bolt of white.


I was awash in it.


And it really started coming together.  The tulle was pretty forgiving, and we trimmed the shape after all the layers were on.


We had weekly fittings to make sure everything was still perfect.


The colored and lace pieces were a bit of ingenious engineering on my part.  To get married in an LDS Temple your dress must be all white, and Katrina wanted to be married in this dress.  I added the pieces of color with hooks & eyes, sewn onto lengths of double fold bias tape.  I numbered them in tiny black marker in between the layers and on the bias tape.  I wish I had a picture or video of all us sisters holding the pieces after the ceremony in the bride's room, me calling out numbers like wedding-dress bingo, and placing them all.  It was something I'll never forget, and neither will the cute temple matrons!

The wedding was in California at the Newport Beach LDS Temple.

You can see she wowed everyone!


It was an amazing experience to create this wedding dress for someone I love, and have it worn in the temple.  The most rewarding thing about it is that she adored it so much!  I was so happy to help her have the day she wanted.  She really was such a beautiful bride!


Since this dress my girls have been sure I'm going to be sewing their wedding dresses.  I told them to make sure they give me enough notice.  Think they will?


Friday, April 17, 2015

Up-cycle: T-shirt Totes, Wydaho, & Cow Bells

Over Spring Break we went to ski for a couple days at Grand Targhee Ski Resort, near Driggs, Idaho but in Alta, Wyoming, right at the back of the awe-inspiring Grand Tetons.  It turns out they call it "Wydaho" because even though it is in Wyoming, the only way to get to it is through Idaho.  Ironic and clever.  I liked it at once.


One evening we ventured into town for my brother-in-law's birthday party at the pizza restaurant in Driggs.  After dinner we needed to get a couple things from the store, so the gals rode back with grandma and Mr. and I found ourselves alone on a hot date at Broulims, Driggs' grocery store.  As we parked and walked in, we were approached by a 20-something girl who was handing out these up-cycled t-shirt tote bags.  Some people ahead of us said no, but I'm never one to pass up free stuff, and I'm always curious about clever handmade things.  She was super nice and smiling and when I asked her if handing out bags had a larger purpose, she glibly responded that no, she was just helping the environment.  I chose a larger one, we used it as cart and bag, and we headed out.  Out loud I mused about the reasons behind a 20-something being outside a remote grocery store, handing out bags she had taken the time to make without any larger purpose than to make sure the 7 shoppers that night didn't use plastic.  To which Mr. responded "everyone needs a cause".  So true.

I vowed that I was going to make some as soon as I got home.  We have many stained and unwearable tees in our possession, and this is a fantastic idea of what to do with them.  Here's how:

Start with a tee-shirt, any size, any pattern.  This is a men's XL.


Cut off the arms, 1 inch in from the shoulder seams, and cut the neck into a big scoop. 


Serge or sew the bottom shut.  For real, it's that easy.  

You have now made your very own Wydaho Tote.


Because, well...just because...I decided to line mine.  It was a tad flimsy, which normally would be fine.  Groceries surely don't care and it's a huge step up from the rip-prone plastic bags you may usually take home with you.  So I found another men's XL in white and repeated the three cuts and one seam.


And now I have two Wydaho Totes.


Now it's a simple matter of matching right sides and all openings, and sewing them together.


I chose to leave the serging on the outside, and while you might judge this as looking unfinished, I've got the original Wydaho Tote and this is waaaayyy better already.


This is my finished tote.  It's tie-dyed no less, which just adds panache by the gallon.  You could make these from any size tee, creating small totes, scripture bags, library bags, gym bags, and the list of possibilities goes on and on.  This would also be a super project if you have a kid that's interested in sewing.  One seam for the beginner.  Four seams for the more advanced.

I've filled mine with my cow bells.  Why, you ask?  Today is the first track meet of the season, I've got TWO girls running events, and I love-love-love cheering them on!  
If you want to sit by me but don't know where I'll be, don't worry.

You'll be able to find me.


Save the planet, be cleverer than a Wydahoan, up-cycle something, and CHEER for your kids!

Monday, April 6, 2015

Tulle Skirts

I think they turned out well, don't you?  The gals were eager to put them on and were preening like peacocks all afternoon.  Success.


I am unhappy with the waistbands.  I mean, why am I pinning elastic on a custom-made skirt?
Perhaps because I was sick, short on patience, and time?  I plan on taking some time this week to fix that little problem.


One of the things that made this weekend even more meaningful were the amazing and inspiring messages we heard in LDS General Conference, combined with the celebration of the Resurrection of our Savior.  Every talk that was given is so applicable and timely, counsel that we can all use in our lives to better our homes, families, relationships, communities, and world.  We heard from living prophets & apostles what our focus should be for the next six months.  How lucky are we?!  Check out #ldsconf #becuasehelives #embark #sharegoodness to see some amazing things about this weekend.

You can listen to, read, or watch any of the LDS Conference addresses here.

This is a quote from one of my favorite talks, by Elder Wilford W. Andersen:


I loved the analogy of family life to an orchestra, and the gospel to the music we dance to.  Dancing without music is awkward and hard to understand, but when we hear and feel the music, the dancing comes naturally.  My girls and I love to dance, spontaneously and with great energy!  We love music and rhythm.  My deep desire is for my family to feel and hear the music & rhythm of the gospel of Jesus Christ, so their dancing will come naturally, spontaneously, and with great enthusiasm.  And I have determined to play the gospel tune more loudly and consistently in our home, so that their ears will be trained to hear, love, appreciate, & yearn for it.

Another Easter with my beautiful family.  How the years do fly by!

Saturday, April 4, 2015

Easter Dresses: Tulle Skirts

Easter is tomorrow, so yep, that means I'm neck-deep in a sewing project and cutting corners like mad.  I've started Easter dresses after a 3 day vacation & a 3 days-and-counting cold.  Why do I do this to myself, you ask?  I have no idea.  I let the girls choose this year, and style themselves.  Which I totally trust, but then I totally have to do the work.  It'll be a good change of pace for us.  When I say Easter dresses I really mean Summer dresses, that they'll wear until Christmas.  But somehow this time they wrangled me into tulle skirts, which I know are highly popular and super fashionable, but really, so very wardrobe specific.  I just do not see them donning these mini wedding poof-balls in July to head to church.  I'll let you know if it happens.


Anyway. 35 yards of tulle & 12 yards of satin later, I'm up to my eyeballs in gathering threads and static electricity.  Also coughing up a lung, because yes, the cold's still here.  I started with this pattern, but found it overly complicated, and so struck out on my own.  I like my method, but the waistband is a tad bunchy & thick.  Which is why the pattern is better.  I found the waist yoke slightly confusing and ended up shortening it so it didn't show as much.  The idea is that the yoke diffuses the poofy-ness from the waisband and disperses it evenly down the hips.

So after sewing two, I think I'll finally get the third right.  Now I just need some photos, because being sick tends to remove entirely my already slumbering penchant for photography.

Happy Easter!

Monday, March 23, 2015

Fabric Bunny Gift Bags Tutorial


It's finally here! The darling bunny gift bag tutorial from my 12 Simple Easter Crafts post found here.  I whipped out 4 in about an hour, and this process would only get faster the more you make.  A veritable factory production line of bunnies.

You will need:

  • 1/4 yard each of 4 different cotton fabrics.  Mixed colors and patterns are cutest.
  • 12" yard, ribbon, or string for each bag.  The above amount of fabric will make around 8 bunnies.
  • 1/4 yard iron-on interfacing.
  • sewing machine, thread, seam ripper, scissors, iron, pins.
  • sew using a 1/4" seam allowance.
Here is the pdf pattern I created.  My first, so be kind ;).  It should print full page, and the body should be roughly 4"w x 4.5"h.  

Cut out all your pieces.  I used all four fabrics to make one bunny, alternating which was the body, lining, front of ear, and back of ears.  Iron interfacing to the all the front ear pieces.


Sew the front and back of the ear, right sides together.  Leave the bottom open for turning.


Clip the round edge of the ear seam allowance so when you turn them, they lay flat.  


Turn the ears right-side-out, and iron them.


Sew the outer bag pieces right sides together.
Sew the lining pieces right sides together, leaving a 1.5" gap in the bottom to turn the bag.


 Pin the ears to the right side of the outside of the bag, so the ears slant away from each other, and touch in the middle.


Then slide the lining over the pinned outer & ears, so the lining and the outer are right sides together.


Sew around the top of the bag 1/4" away from the edge.
Turn the bag right-side-out through the hole in the lining.


Tuck the lining into the outer bag body.


Top stitch around the bag 1/2" from the edge.  
This will be the casing for your 12" of yarn, string, or ribbon.


Completed top stitching.


Clip the stitches on the left side of the bag between the top-stitching and the top edge of the bag.  This will the be opening for your yarn to go through.


Tie a knot in the end of your yarn, and stab a safety pin through it.  Then thread it through the opening, around the casing and out again.


Ready to tie!


Fill it with candy and share!


Thinking aloud, in front of the girls, I said I should make one for each of the cousins for Easter...
that would be 33.
I need to stop saying crazy things aloud.  Or just get started earlier.


I just love giving handmade gifts.  It's the little extra effort that makes it so much more special.

Have you started Easter dresses yet?  I've got the final decision from the girls, they know what they want.  Now I just have to get moving and buy about 50 yards of tulle.  I love spring dresses, but man, they're a lot of work!

Happy crafting!

Thursday, March 19, 2015

Spring Fabric!


I just love the raw potential of cuts of fabric.  I am a  hoarder; my stash is large, and largely useless.  But sometimes I can't resist buy half-yards on sale.  The bright colors cheer me up, and my mind gets working on which of my endless project ideas will transform these darling bright cottons.

Usually it's a bag, because I'm a bag lady.  Zipper pouches, purses, book bags, clutches, bentos...so. many. choices.  so little time!

This offering of 40 bag tutorials from Andrea's Notebook makes me practically salivate.  
And this is only the first 10!  Aahhhh!

40 fabulous free bag pattern tutorials!

Today I'm enjoying Throw-back Thursday, tending my 2 nieces ages 3 & 4.  There's nothing quite like the sound of little girls singing, playing dolls, and eating gogurts.  And being asked to change the dolls' clothes every 2 minutes.  It seems like only yesterday I was here with my own three.  My, how time flies when you are loving every minute!

What are you going to do with your fabric stash?
Check out my Sewing Pinterest board for more cute ideas!


Happy sewing!


Tuesday, March 10, 2015

Tote Bag Tutorial


Do you love bags? I do! Small, large, simple, complex, with closure, without, lots of pockets...really any kind at all.

I also really love to sew them.  All you have to do is put some squares together.  I'll show you how simple it really is!

Cut list:
1/2 yd of each should do it.

Outer Fabric:
2 - 12x12 pieces for the body
3 - 12x4 pieces for the sides & bottom
2 - 12x20 pieces for the handles
2 - 2x6 pieces for the small loops
1 - 6w x 4h for large pocket
1 - 4w x 7h for pen pocket

Liner:
2 - 12x12 pieces for the body
3 12x4 pieces for the sides & bottom
1 4x7 piece for the pen pocket
1 6w x 4h for large pocket


Fold the two pieces for the loops & the two pieces for the handles.  First fold the outer edges to the center.  


 Then match up the outer folded edges.  An iron is really hand for this step.


Sew along the matching folded edges.  


 So you'll do this four times. 2 handles, 2 loops.


Next takes the liner & outer fabric pieces that are 4x7, and sew them right sides together, leaving the bottom open.


Clip the two sewn corners so it will lay flat when you turn it.  Now turn it right-side-out.


Fold the open edges in and top-stitch the opening closed.


Pin the pocket to the right side of the lining piece that is 12x12.  Top stitch this in place, leaving the top open so it's a pocket.  Repeat with the 6x x 4h pieces for the large pocket.


  OR (dare I suggest) you can cut two lining pieces and use the outer fabric to make a trim. Sew the trim to the right side of the lining fabric, then fold over and fold again and top stitch.  Basically you just made your own double-fold bias tape.  Skip this if you're brain is cramping.  Stick with me and you'll be doing it in no time!   


This is both pockets sewn in.  Please pin.  It will make everything turn out lined up and tidy.


Now sew the handles & loops to the right side of the 12x12 piece of outer fabric, pointing DOWN.  This ensures that when you flip your bag the handles will be on the outside of the bag.  Handy.  You'll do this twice: two handles, two sides.


Now sew the 4x12 pieces to the 12x12 pieces for the sides, right-sides together, completing a bag without a bottom.  Choose your seam allowance: 1/2", 3/4".  Be consistent when sewing the body together.


Repeat with the lining.  Sew all pieces right sides together.


Now pin and sew the bottom on to the outer fabric.
When you get to the bottom of the lining bag, leave a 2-3 inch gap.  This will be where you pull the bag inside out.


Pin the outer bag and the liner bag right-sides together with the straps inside.  Line up the side seams.  Don't worry if there are puckers.  They'll sew out.


Sew the bags together all the way around.  You don't need a gap because you left one in the lining.  This helps make the top nice and neat.  I use a wider seam allowance for the top, so I have more to top stitch when it's turned.


Now pull the outer fabric out through the liner hole.


Ta-daa!


Close the liner hole by folding the edges inward, and top-stitching the 2-3 inches together, close to the folded edges.


Iron the bag's top edge.  Make sure that the outer fabric is showing a little above the liner.  This helps the outside look finished without the liner sticking out weirdly.


Top-stitch around the bag.  Make sure you get through the liner, the outer, & the straps.  This will help reinforce the straps since they get tugged on so much.


I love nice, neat top stitching!


This is the inside of the bag, all done!  The small pocket holds pens nicely, and the large one holds a cell phone safely.  I'm not sure why I added loops, but I think it was in hopes that I'd add a clip and hook my keys to it, and they'll fall nicely into the inside of the bag.  I'm constantly searching for my keys.  Anything to make life simpler if you're the one who's making it!  Customize.


It's spacious, but not too huge.  A perfect library bag, beach bag, or purse alternative.  And the straps are a length I love, over-the-shoulder and tuck under the arm.  Perfect!


I hope you're inspired to make a clever tote.  And since it's my first tutorial, I hope the instructions were comprehensive enough!  Email me if you need more info!

Happy sewing!